Tuesday, February 28, 2017

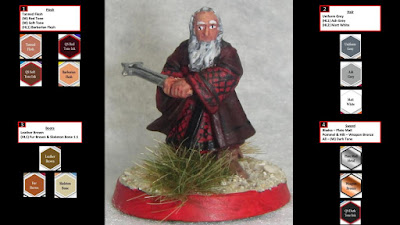
Painting Guide: Kili


Every elf maiden’s dream dwarf arrives with Kili of Games Workshop's Escape From Goblin Town set miniatures.  The sculpt of the Kili miniature is accurate and provides a nice dynamic pose for the rash young dwarf.      


1.   Paint the flesh using Tanned Flesh.
1a. Wash the skin with Red Tone to get the ruddier tone of the Dwarfs.
1b. Wash the skin again in Flesh Tone.
1c. Highlight using Barbarian Flesh.
2.   Paint Kili’s overcoat, trousers, gloves, and quiver with a 10:1 mix of Oak Brown and Matt Black.
3.   Paint the arrow shafts and hair with Oak Brown and highlight the trousers with the same.
4.   Paint the arrow fletchings with Monster Brown and highlight the hair and overcoat trim with the same.  The bottom of the overcoat and its sleeves have a fringe and so need small vertical lines vice one horizontal line.  A very fine 5/0 or 10/0 brush works best for this.


5.   Highlight the overcoat with Leather Brown.
5a. Wash the overcoat with Strong Tone.
6.   Now paint the quiver, sword belts, scabbard, and knife handle with a 1:1 mix of Oak Brown and Chaotic Red.
6a. Highlight the above with Leather Brown.
7.   Next paint Kili’s tunic and hood with Deep Blue.
7a. Highlight the same with Crystal Blue.
7b. Finish with a final highlight of Wolf Grey.
8.   Paint the tunic’s trim Matt Black.
8a. Now, using a very fine brush and thinned Desert Yellow, paint the “X”s down the trim.


9.   Paint the boots, bootstraps, and wrist guards in Matt Black.  This step is not in a the graphic as I did not have it in my notebook due to the miniature being primed in black.
9a. Highlight the above with Uniform Grey.
9b. Do a second light highlight with Ash Grey.
10. Paint the studs and buckles on the belts and wrist guards in Gun Metal.
11. Paint the sword blade in Plate Mail Metal.
11a. Paint the hilt and pommel in Greedy Gold.  I did not wash Kili’s weapons as, like Dwalin, he is one of the best warriors and I feel more likely to take astute care of his weapons.
12. Finally for Kili’s bow paint the wood portion with Fur Brown.
12a. Paint the grip and the tips in Matt Black.


Some last notes:  
A. The eyes were painted between the Flesh Tone Wash and the Barbarian Flesh Highlight.  The eyes are done with a 5/0 brush.  First paint a horizontal white line and then place a black dot in the center.
B. AP Soft Tone is a good wash for flesh and other light colored items.
C. AP Strong Tone is a good general brown wash similar to Citadel's Agrax Earth Shade. 
D. AP Dark Tone is a good black wash similar to Citadel's Nuln Oil.


I based the miniature with coral beach sand for the rocky/sandy caves of Goblin Town and added some Highland Tufts and Meadow Tufts from The Army Painter Battlefields range.  I then painted the edge of the base in Deep Blue. 


I am beginning to dislike the blown up pictures as I can see all the mistakes and areas I need to correct.  Good learning tool I guess.


Next week Kili’s brother comes in right behind him.

I have to thank TALE OF TWO PAINTERS for the inspiration for these tutorials.  Unfortunately, I do not have step by step photos like they do as I found their site after I was a quarter of the way complete.  They painted the miniatures using Citadel paints.  I felt a guide using The Army Painter brand was warranted, especially as there is no readily available conversion chart for Citadel and AP brands like the other major miniature paint brands (Vallejo, P3, Reaper, etc.).  I currently only have the 42 bottle 2015 Mega Paint Set II, so there is a lot of mixing of paints to get the right color. (I’m hoping to get the Veteran Warpainter Upgrade Set with an additional 82 paints that just came out on the first).

Sunday, February 26, 2017

Weekly Workbench 26 Feb 2017

So this week I came up with a weekly schedule for myself to help both focus and diversify my work to keep from burn out.  Monday is to work on my historical armies, primarily Bolt Action and soon Test of Honor miniatures when they come out; Tuesday I publish the tutorial posts as I have Cub Scouts that night as well; Wednesday I work on Sci/Fi with a focus on Beyond the Gates of Antares and Doctor Who: Into the Time Vortex; Thursdays is a wash due to other commitments; Friday I delve into Fantasy with a heavy focus on The Hobbit/Middle Earth Strategy Battle Game.  As I usually only have 60 to 90 minutes a night I devout to painting/building the weekend allows me to hit bigger projects or finish things up as I see fit.

Bolt Action:

Monday I dug out my Bolt Action army case and pulled out a Browning .30cal Machine Gun Team Firing and a 60mm Light Mortar Team.  Already primed in Army Painter Army Green Color Primer I did the flesh and eyes.

Bolt Action USMC .30cal MG Team and Medium Mortar Teams

Today, I pulled out some of the figures I had mostly completed about nine months ago and started to base them.  The terrain is done, I will be adding flock and paint as needed next now that the Okinawa sand is sealed.  As happy as I was with these figures I have seen some improvement in my skill and definitely would like to update these, though they are perfectly great for tabletop standard.  I will probably do some highlight on the skin to lighten them up some.

Bolt Action USMC various

Beyond the Gates of Antares:

Ghar Assault Squad member front

Wednesday, I initially broke out my Boromite Work Gang and Boromite Gang Fighters but realized the base coat/primer of The Army Painter Skeleton Bone was too light for the scheme I was now looking to do.  So they went into the jars of Simple Green and I started work on a single Ghar Assault Squad member to figure out a color scheme, settling on Blue and Black.

Ghar Assault Squad member rear

Saturday, I pulled out the Boromites and scrubbed them down, first with an old toothbrush and then with a wire brush wheel on my Dremel. I then proceeded to glue heads back on bodies and bodies onto bases with some Gorilla Super Glue.

Boromite Gang Fighters

Today, I took them outside and primed them with Testor's Model Master Grey Primer.

Boromite Work Gang

Middle Earth Strategy Battle Game:

Radagast front

Friday, I worked some on Radagast and almost completed him today.  I just have some touch ups on the model and finish the hedgehog, staff head, and base.  I think he is coming along nicely, though I do not enjoy the scenic base as much as it is a pain to get to all the parts to paint.

Radagast rear

Today, I added the sand to Gandalf's figure and will likely add the flock when I do the Bolt Action figures as well.

Gandalf

Also today, I primed Gollum, who, while not part of the Escape from Goblin Town set, will be added to the end of the tutorials as you cannot have Goblin Town without Gollum.  The stinker did not take the primer well though and I will have to go back for a second light coat.

Gollum

Lots of different things going on in each genre this week.  I would guess in about two weeks everything will be settled down and I will hopefully be getting single models completed each week or majority portions of a squad size units completed each week.  Hope you enjoyed and remember to click on the pictures for a larger view.  See you Tuesday for Kili's tutorial and feel free to leave some comments.

Tuesday, February 21, 2017

Painting Guide: Balin


Balin is the next dwarf arrive for tea of Games Workshop's Escape From Goblin Town set miniatures and is Dwalin’s brother.  Balin was an absolute joy to paint.  Once again, the face sculpt was uncannily accurate and captured the actor well.  The pose shows off Balin’s role well, that of the wise counselor of Thorin, yet more than capable of drawing his sword in action.      


1.   Paint the flesh using Tanned Flesh.
1a. Wash the skin with Red Tone to get the ruddier tone of the Dwarfs.
1b. Wash the skin again in Flesh Tone.
1c. Highlight using Barbarian Flesh.
2.   Paint Balin’s hair with Uniform Grey.
2a. Highlight with Ash Grey.
2b. Highlight the hair again using Matt White. Use a 5/0 or 10/0 brush to paint fine lines for this.
3.   Paint his boots Leather Brown.
3a. Highlight the boots with a 1:1 mix of Fur Brown and Skeleton Bone.
4.   Paint sword blade in Plate Mail.
4a. Paint the sword pommel and hilt in Weapon Bronze.
4b. Wash the entire sword in Strong Tone. Make sure enough stays in the center groove to bring out the detail.


5.   Paint the mantel and overcoat in a 6:1 mix of Oak Brown and Matt Black.
6.   Paint the tunic and overcoat in Chaotic Red.
7.   Using your finest brush (10/0 or 5/0) heavily thin down Matt Black so it slides of the brush and paint the details along the trim of the overcoat.  This takes a steady hand and is all freehand so take your time here.
8.   Last, wash over the mantel, overcoat, and tunic with Dark Tone.


Some last notes:  
A. The eyes were painted between the Flesh Tone Wash and the Barbarian Flesh Highlight.  The eyes are done with a 5/0 brush.  First paint a horizontal white line and then place a black dot in the center.
B. AP Soft Tone is a good wash for flesh and other light colored items.
C. AP Strong Tone is a good general brown wash similar to Citadel's Agrax Earth Shade. 
D. AP Dark Tone is a good black wash similar to Citadel's Nuln Oil.


I based the miniature with coral beach sand for the rocky/sandy caves of Goblin Town and added some Highland Tufts from The Army Painter Battlefields range.  I then painted the edge of the base in Pure Red. 


Next week the elf maidens’ favorite dwarf arrives.

I have to thank TALE OF TWO PAINTERS for the inspiration for these tutorials.  Unfortunately, I do not have step by step photos like they do as I found their site after I was a quarter of the way complete.  They painted the miniatures using Citadel paints.  I felt a guide using The Army Painter brand was warranted, especially as there is no readily available conversion chart for Citadel and AP brands like the other major miniature paint brands (Vallejo, P3, Reaper, etc.).  I currently only have the 42 bottle 2015 Mega Paint Set II, so there is a lot of mixing of paints to get the right color. (I’m hoping to get the Veteran Warpainter Upgrade Set with an additional 82 paints that just came out on the First of February).

Sunday, February 19, 2017

Weekly Workbench 19 Feb 2017

Lots of different projects this week and as it is a long weekend (and I wanted to finish up one of the models) you get this one day later.  Remember to click on the pictures for larger images.

First up, I primed the LCM 6 from Sarissa Precision.  I need to add some weathering affects and decals.  Unfortunately, Warlord Games is out of their vehicle decals and so I need to practice some freehand numbers before I get this done.


Then I sealed Thorin's Company from Games Workshop's Escape From Goblin Town Set.  These are the miniatures I am doing the tutorial posts on Tuesdays.


Next, I finished painting Gandalf from the above set.  While the picture shows a lighter grey the miniature is much darker.  I am debating on repainting the grey to a lighter shade before basing, though as I have a second Gandalf from The Fellowship of the Ring set I might just call it good.


I then started working on the special miniature from the Goblin Town Set, Radagast.  I still have a lot to go on him, but I did get side tracked with rebuilding two computers and then on a different miniature as detailed below.


Due to the busy schedule this week I had only a little spare time.  During a brief snippet of this I started gluing together the small ruin pieces from Impudent Mortal's 28mm Entry Level Ruins I received for backing their Kickstarter.  I still have the large portions to glue together and I have not decided how to paint them as my WWII armies are from the Pacific, so maybe they will be used for an abandoned world in Beyond the Gates of Antares or as parts of the ruins of Osgiliath.


Today, I primed my Fell Warg Pack from Games Workshop and have them ready for painting.


Last, my eye caught the Reaper Miniatures' sword woman provided in my Hobby University class Advanced Beginner's Painting at Historicon 2016.  She has sat there with just her cloak painted for about seven months and I thought I should finish her as a "fun" project.  I have since learned that my perfectionism and improving skill and techniques will probably never allow me to paint "quick, fun" miniatures again.  I did use a lot of the techniques I picked up doing Thorin's Company. She was primed before any mold lines were removed by the event staff so that is unfortunate but I think she makes a fine She-Devil with a Sword, Red Sonja!  


Thanks for visiting and see you all next week!


Tuesday, February 14, 2017

Painting Guide: Dwalin


First, I have to thank TALE OF TWO PAINTERS for the inspiration for these tutorials.  Unfortunately, I do not have step by step photos like they do as I found their site after I was a quarter of the way complete.  They painted the miniatures using Citadel paints.  I felt a guide using The Army Painter brand was warranted, especially as there is no readily available conversion chart for Citadel and AP brands like the other major miniature paint brands (Vallejo, P3, Reaper, etc.).  I currently only have the 42 bottle 2015 Mega Paint Set II, so there is a lot of mixing of paints to get the right color. (I’m hoping to get the Veteran Warpainter Upgrade Set with an additional 82 paints that just came out on the first).


The first dwarf to arrive for tea of Games Workshop's Escape From Goblin Town set miniatures is Dwalin of course.  Dwalin was probably the toughest dwarf to paint due to the pose and the axes strapped to his back.  The sculpt is good though the handle of the mallet snapped in the center sometime after gluing him together and before painting.  I could not glue it back together so I wrapped it in some green stuff making the center part of the shaft thicker than the ends.  Dwalin’s scar and head tattoos are not sculpted so they require some freehand, something I am working on and my wife’s Valentine’s Day gift of a magnifying glass should help with.  Overall I really like this sculpt and he certainly portrays one of Thorin’s “best warriors” rather well.    

1.   Paint the flesh using Tanned Flesh.
1a. Wash the skin with Red Tone to get the ruddier tone of the Dwarfs.
1b. Wash the skin again in Flesh Tone.
1c. Highlight using Barbarian Flesh.
2.   Paint Dwalin’s hair with Uniform Grey.
2a. Thin Matt Black with water and paint over the hair.
2b. Highlight the hair using Ash Grey. Use a 5/0 or 10/0 brush to paint fine lines for this.
3.   Paint his trousers in Angel Green.
3a. Highlight the trousers with Green Skin.
4.   Paint Dwalin’s armor in Army Green.
4a. Highlight the edges of the armor panels and raised bumps with Necrotic Flesh.
4b. Wash the armor in Green Tone.


5.   Paint the tunic (sleeves and below the belt) in Necrotic Flesh.
5a. Wash the tunic with Green Tone.
6.   Paint the under armor panels (between the Tunic and the Armor) Leather Brown.
7.   Belt, Chest Straps, Boots, and Gloves are painted in Oak Brown
7a. Highlight with Fur Brown.
7b. Wash with Strong Tone.
7c. Highlight with Monster Brown.
8.   Paint the fur on his shoulders and boot tops in Fur Brown.
8a. Wash the fur in Strong Tone.
8b. Highlight with Monster Brown.
8c. Do a final highlight with Desert Yellow using a 5/0 or 10/0 brush to paint very thin lines.


9.   Paint the weapons shafts (Mallet and Axes) in Oak Brown.
9A. Highlight with a mix of Oak Brown and Leather Brown in a 2:3 ratio.
10. Paint the Axe Blades & Pummels in Plate Mail Metal.
11. Paint the Buckles, Mallet Head, Toe Caps, and Knuckle Caps in Gun Metal.


Some last notes:  
A. The eyes were painted between the Flesh Tone Wash and the Barbarian Flesh Highlight.  The eyes are done with a 5/0 brush.  First paint a horizontal white line and then place a black dot in the center.
B. AP Soft Tone is a good wash for flesh and other light colored items.
C. AP Strong Tone is a good general brown wash similar to Citadel's Agrax Earth Shade. 
D. AP Dark Tone is a good black wash similar to Citadel's Nuln Oil.


I based the miniature with coral beach sand for the rocky/sandy caves of Goblin Town and added some Highland Tufts from The Army Painter Battlefields range.  I then painted the edge of the base in Angel Green. 


Next week the Dwalin’s brother arrives and Bilbo begins to wonder what Gandalf has gotten him into.

Saturday, February 11, 2017

Weekly Workbench 11 Feb 2017


So, in order to have a more timely posting schedule (though, with the Hobbit Tutorials, I have 16 more weeks of posts in the hopper), I am going to start this weekly feature showing what I have going on during the past week.  This should come out on Saturday nights or Sunday mornings while the Tutorials will remain on Tuesdays until I run out.


First up, I finished all 13 dawarves of Thorin's Company to include basing.  All that is left is putting the overcoat to seal everything.  This will take place tomorrow when temps climb back into the 60's.


All that remains for the Escape from Goblin Town set (other than catwalk terrain) is Gandalf the Grey and the special Radagast the Brown miniature.  Those will be getting hit up this week and then I think I will start painting my Beyond the Gates of Antares' Boromites and Ghar finally.


Seeing as we were out at the Fredricksburg Expo and Convention Center for an event I stopped by Hobby Lobby and picked up some supplies:
-Model Master Gray Primer is what I usually use when not using The Army Painter colored primers.
-Model Master Lacquer Overcoat (Flat) is what I use to seal my miniatures now that I am back in the US (I used Tamiya in Okinawa).
-Tamiya Extra Thin Cement, I usually use the regular but they did not have it and I was almost out after a spill.  When I got home the top was stuck on and I crushed and broke the top off trying to get it unstuck.  So now it resides in the regular Tamiya Cement bottle after cutting down the brush to fit.
-Vallejo Retarder Medium, now that Thorin's Company is done and I have a bunch of standard figures (Ghar, Boromites, USMC, IJA, Wargs, ect.) requiring mass painting I want to try something besides water to thin and keep the paints wet on my pallet much longer.  The Army Painter finally came out with a Warpaints Mixing Medium, which is good as their paints (with the exception of Matt Black) tend to be thick, and I am looking forward to getting some of their's soon.
-2 x Hobby Brush Sets.  I bought a set originally for the four year old to paint his Reaper Bones figures with, found they worked as well if not better than the ProArte and Army Painter brushes at a fraction of the cost I decided to pick up a couple more packs and so I could stop being told how I am stealing his brushes every time he comes into the room.


Last item worked on this week is my LCM (6) from Sarissa Precision.  I got this for Christmas two years ago but did not want to assemble it before leaving Okinawa for fear of it getting damaged in the move.  It was a little beat up when I finally found it today buried in a box of books still waiting to be unpacked but went together fine and looks good.  I was reminded of it as one of this week's EWS lesson was on all the "L" ships for Navy.  Looking forward to landing my M3 "Satan" Flame Tank against some Japanese defenders in Bolt Action with it.


See you all next week!

Tuesday, February 7, 2017

Painting Guide: Bilbo Baggins


First, I have to thank TALE OF TWO PAINTERS for the inspiration for these tutorials.  Unfortunately, I do not have step by step photos like they do as I found their site after I was a quarter of the way complete.  They painted the miniatures using Citadel paints.  I felt a guide using The Army Painter brand was warranted, especially as there is no readily available conversion chart for Citadel and AP brands like the other major miniature paint brands (Vallejo, P3, Reaper, etc.).  I currently only have the 42 bottle 2015 Mega Paint Set II, so there is a lot of mixing of paints to get the right color. (I’m hoping to get the Veteran Warpainter Upgrade Set with an additional 82 paints that just came out on the first).

The first of Games Workshop's Escape From Goblin Town set miniatures is Bilbo Baggins.  Overall I like this sculpt with the exception of the face.  There are no details for his mouth (which is closed) so the thin paint line for his lips kind of disappears.  Other than that I am really happy.  He comes with two right arms, one holding his walking stick and one with him brandishing Sting, which is the one I went for.  Bilbo was done very simply with plain colors and limited washes and highlights as compared to the Dwarves.

1.   Paint the flesh using a mix of 3:2 of Skeleton Bone & Barbarian Flesh.
1a. Wash the skin with Flesh Tone.
2.   Trousers are painted in Oak Brown.
3.   The Vest is painted in Angel Green.
4.   The Scarf is painted in Desert Yellow.


5.   I painted the coat in Chaotic Red (finally found that missing bottle!)
6.   Stings blade is painted in Shining Silver.
6a. Next, wash Sting’s blade in Blue Tone to let Bilbo know goblins are about!
7.   Sting’s pommel and hilt are painted in Gunmetal.
8.   The Hair (head and feet) is painted in Desert Yellow.
8a. Highlight the hair in both spots with Demonic Yellow using thin lines vice dry brushing due to the fine detail.
9.   Last, paint the buttons in Weapons Bronze.


Some last notes:  
A. I did not wash any of the metal on Sting as it is a legendary weapon and I feel would not have the worn and dingy look once cleaned from the troll liar.
B. AP Soft Tone is a good wash for flesh and other light colored items.
C. AP Strong Tone is a good general brown wash similar to Citadel's Agrax Earth Shade. 
D. AP Dark Tone (not used this for Bilbo) is a good black wash similar to Citadel's Nuln Oil.


I based the miniature with coral beach sand for the rocky/sandy caves of Goblin Town and added some Highland Tufts from The Army Painter Battlefields range.  I then painted the edge of the base in Angel Green.  


Next week the Dwarves will begin to arrive for their meeting and recruitment of a burglar!


Weekly Workbench 18 March 2018

I did not get to finish a war band member this weekend as I finished converting the boys triple bunk beds into a regular bunk and a loft bed...